I have played a few matches representing the Swedish National Team, at the online European Championship, but up to date I had never won a game. My last game, in the spring, against Germany, was perhaps my best so far, and I got very close winning against a significantly higher rated opponent. I was quite pleased with that game, but it can never feel quite good when your team loses. This year around Sweden plays in the B-league, and South Africa has also been given a spot there (an initiative that I fully support), and we were paired to play them in the first round.
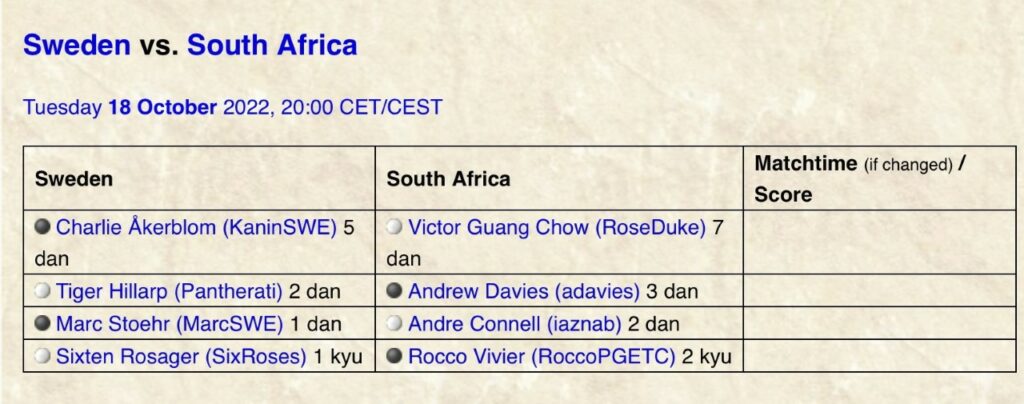
I felt more confident that I have before:
Black: adavies 3d+
White: Pantherati 4d
Date: 2022/10/19
Rules: Japanese
Komi: 6.5 points
Result: White wins by 9.5 points
White: Pantherati 4d
Date: 2022/10/19
Rules: Japanese
Komi: 6.5 points
Result: White wins by 9.5 points
1.●R16
2.○Q4
3.●D17
4.○D4
5.●C14
6.○P17
7.●Q15
8.○M17
8.○D16
9.●C16
10.○E17
11.●D18
12.○E15
9.●C3
10.○D3
Strangely, this can be considered a slight mistake in direction. The distance between the wall I am now building, and the marked stone is so vast that I will need more than two extra moves to close off that side. Blocking the other ways gives me the option to give Black the choice between a rather unfavourable joseki, or to give me a side that is easier to close off and build from. (That is my understanding of the matter. I always try to put the lines I find into words that are easier to remember, and therefore easier to correct.)
10.○C4
11.●D3
12.○F3
13.●E3
14.○E4
15.●F2
...and this is the point where it turns out that this direction is not bad at all due to:
16.○B3
17.●B2
18.○E2
19.●B4
20.○C2
21.●A3
22.○D2
23.●B3
24.○G2
25.●F4
26.○G3
27.●C6
28.○F6
29.●D8
Now that look at it again, I am not so sure about my first conclusion. Yes, White got the bottom side, but Black developed the right, and I would not be unhappy with Black's position.
19.●D2
20.○G2
21.●F4
22.○G3
23.●B4
24.○B5
25.●A3
26.○D6
And Black has been closed off with very few points indeed, while White has taken the initiative on both sides.
17.●G3
18.○F4
19.●H2
20.○C2
21.●D2
22.○D1
23.●E2
Is somewhat favourable for White locally, and one might say that Black has payed a price for getting out on the bottom side. Since White's game plan (with komi) is to cut the board up into smaller pieces, not allowing Black to use a moyo strategy, this is something of a success for White.
11.●C4
12.○C6
13.●C5
14.○D5
15.●B6
16.○D16
17.●C16
18.○E17
19.●D15
20.○E16
21.●D18
22.○E15
I usually play the alternative joseki here, but I did not like the outcome here:
22.○C17
23.●E18
24.○G17
25.●B17
...and I still need a move in the marked area, which would make my position seriously over concentrated.
23.●C18
24.○E15
Would be nice for me. There is some aji left in the corner that might give me a squeeze at a later stage.
23.●E14
24.○F14
25.●E13
26.○F13
27.●E18
AI-sensei evaluates this favourably. I did not know the joseki here, but I felt that it must be right to take the turn.
28.○E12
29.●F17
This is a mistake that allows me to improve my shape. Cutting at one of the marked points would have been better.
30.○G16
31.●G17
32.○H16
Somewhat slack, but I felt that having a bit of influence would not hurt.
32.○C13
Is a key move, here and later.
33.●F12
34.○D12
Noooo! I immediately realized that this is bad. I considered the key (marked) point for a few seconds, but decided that I did not like that Black could gobble it up:
34.○C13
Still, this is what I should have played, since
35.●D12
36.○E11
37.●D13
38.○D11
39.●C11
39.●C12
40.○G12
...would be great for me. My influence dominates the board.
35.●C13
Yes, indeeed. Now my shape is so so.
36.○E10
37.●G12
38.○H14
38.○G10
Was better according to the AI, but I was too attached to the marked stones, and did not see far enough to evaluate the development correctly:
39.●F15
40.○F16
41.●G15
42.○G14
43.●H15
44.○H14
45.●J15
40.○H13
41.●F16
42.○K4
...and it seems that my position is very good.
39.●J12
40.○H17
This was the first move that I spent a few minutes on. I felt that it fulfilled more than one purpose in both closing off the upper side, while not giving Black any annoying sente-moves against my stones. Since my stones at the top gets stronger, it also weakens Black's stone that are floating in the center. The AI says that it is "-0.7", and claims that the marked points are bigger.
41.●C7
42.○D6
43.●H9
A calm a steady move that both makes Black's group stronger, while also threatening to separate my stones on the left. The marked points are big (and prefered by the AI), but I strongly symphatize with Black's choice.
44.○E8
It felt soo nice to connect the stones, but once again it was better to press the corner from the other side:
44.○C2
45.●D7
46.○G10
47.●B8
48.○B3
49.●B4
50.○A4
51.●B5
...and it is not possible for Black to attack my marked stones properly without ending up in trouble himself.
45.●C2
An obvious move for a dan-player. This takes care of the sequence that I give in the other line.
45.●K3
46.○C2
47.●B2
48.○B7
49.●D2
50.○B5
The AI finds this situation about 3 points better for White than after Black's decend to C2.
46.○R6
47.●Q7
48.○R7
Yet another less than good move.
49.●Q9
50.○S9
My two last moves were slack, and I have lost some ground since the game started, but nothing to really be worried about. I played S9 with too narrow a mind-set, and I will save a screen-shot of this position for later, so that I can avoid similar moves in the future.
50.○H7
Is a good move.
50.○R12
Is the AI's suggestion, but it would take more time for me to evaluate such a move than I felt I had at that moment. After
51.●O16
52.○P12
It is supposedly not at all bad for me, but even with the two half-weak (marked) groups, I find to be a position that seems harder to play for White.
51.●K3
52.○M3
52.○O3
This is a key point, but I felt that it did not put enough pressure on Black's stone.
53.●G3
53.●O3
Would be quite annoying. Either I will have to allow Black to live in the corner, or the two marked stones will become connected, making me regret my ambitious jump to M3.
54.○E2
Perhaps the worst move in the game. It came as a bit of a shock to see that AI-sensei gives it as "-4.5", but having thought about it for a while I now totally get it. It is very small for Black to play a stone in this area, so I should try to get forcing moves from above that might later help me attack the floating stones in the center (and thus reduce a possible moyo of the kind that later comes about).
54.○H4
Is the AI's suggestion, and it makes a lot of sense:
55.●H3
56.○J4
57.●K4
58.○J3
59.●O3
With a complex fight ahead.
55.●Q3
I thought this was a grave over-play during the game, but it is only about half as bad as my last move. :)
56.○P3
57.●P4
58.○P5
59.●O4
60.○O3
61.●Q5
This is bad since it forces me to stabilize my position in the corner, which robs the marked stone of the oppotunity to live at a later stage.
61.●N4
62.○M4
63.●O6
Leaving the aji in the corner, would have been much better. The AI evaluates the position as about 3 points + for Black.
62.○R4
63.●N4
64.○M4
65.●Q6
This is simply a two point loss compared to the alternative.
65.●R5
66.○S5
67.●Q6
68.○S4
69.●O6
Compared to the game, I was forced to play two stones inside my territory.
66.○R5
67.●O6
68.○N3
68.○L2
If I play here, then Black's descent to Q2 becomes sente and this might turn into a problem at a (much) later stage.
69.●F6
70.○C8
Arrgh. This gives me some crappy shape, but I end in gote. The moment I played it I regretted it. I was surprised to see that it only entailed a loss of about 2 points.
70.○D7
71.●C8
72.○G7
Was more natural, and less passive.
71.●B7
Another mistake that I did not consider as such during the game.
71.●D7
72.○E7
73.●B7
74.○E6
75.●G7
And in this position I will have to take some care not to die with my stones on the left. The AI recommends
76.○H6
With great complications. This move might seem hard to understand for a kyu player, but it is on a key shape point, and if Black just defends with
77.●F5
Then...
78.○G8
Gives White a lot of forcing moves, while the marked stone will retain some aji if White plays stones around K6 later.
79.●H7
80.○H8
81.●J8
82.○G9
White has eye shape, and if Black is not alert then White will be first to play on the right side, when it will become very, very hard for Black to catch up.
72.○D7
73.●L6
74.○M6
I thought for a long time about how to minimize Black's area in the center, and yet I came to a bad conclusion.
74.○N6
This is what I wanted to play, and the AI coonfirms that it is the right move. However, it would not have been the right choice to play something unless you see the follow up, and I did not:
75.●M5
...is what worried me, but after
76.○N5
77.●O5
78.○O7
79.●P6
80.○N8
Black has problem with the shape on both sides, and it will not be hard for White to escape with the stones.
75.●M7
76.○N6
77.●N7
78.○O5
79.●P6
80.○N5
I thought this was not absolutely horrible, since there are some cutting points still in Black's shape. Still, not exactly a local success...
81.●O16
This move has been looming for the last fifty moves or so. I decided to be patient and take what territory I can get.
82.○O17
83.●R10
84.○S10
85.●N16
86.○M16
87.●M15
88.○L15
Meh. I should have pushed at P16 first, but I was now getting low on time, so I decided to play a bit faster...
89.●L14
90.○P16
91.●K15
Similar to the atari at Q5, earlier, this is a bit of a thank-you-move for me. It was better to just defend the cuts:
91.●N14
92.○P15
This is just horrible now...
93.●L16
94.○K15
95.●N17
96.○L17
97.●N18
Would be horrible for me.
92.○K15
93.●P15
94.○L7
With a perfectly balanced game.
92.○L16
93.●N14
94.○P15
95.●P14
A huge blunder. My opponent had much more time at this stage, so it is a bit suprising.
95.●K16
Was what I expected, when I had planned (the correct)
96.○L18
I judged the prize for Black's reduction to be worth it in the light of that I "got out" at P15, but after
97.●K13
98.○J14
99.●K14
I missed that Black can separate my stones by playing at the marked point, so I will have to play another move in the area, giving Black the time do something about P14. Still, the game would be about balanced.
96.○O14
97.●O13
98.○O15
99.●Q13
100.○K13
This is a key point and i started to feel optimistic. I counted that it was unlikely that Black would get more than thirty points on the left side, and I have about five points more in the lower right. Then there is komi, and my points at the top. I felt that, if I take the big points on the sides, I can allow Black to get about 40 points in the center and still win.
101.●K12
102.○L13
103.●M12
104.○G5
As my friend Ludvig use to say "too much talent", indicating that I am trying too hard to play creatively. The marked point was "shining" (a lesser known term that I have heard many go-players use), and it was also the best move.
105.●K5
106.○J4
107.●J3
Another blunder, losing almost five points. Due to this move my not so good idea turns out wuite well for me, and leaves me in a position where it is quite hard to lose.
108.○H7
109.●F2
110.○K7
111.●L7
112.○F3
113.●F4
114.○E3
115.●H4
116.○H5
117.●J5
117.●G4
118.○J5
119.●K4
120.○K8
121.●F5
122.○G8
118.○G4
119.●H3
120.○G7
121.●S11
122.○R18
Following my plan to take the big points.
122.○K8
Was the bigger move, but I still fight to understand how it can be...
123.●K8
124.○J8
125.●J9
126.○S17
127.●S16
128.○T16
129.●R17
130.○S18
131.●T15
132.○T17
133.●S14
134.○L12
Not a good idea!! (to take away your own liberties...)
135.●L11
136.○K14
137.●M14
137.●J14
138.○J13
139.●H13
140.○M13
141.●N13
142.○J15
143.●M14
144.○K16
145.●G10
Was an improved version for Black, but I am still leading with around 10 points after komi.
138.○H13
139.●C11
140.○C12
141.●B12
142.○C10
143.●B10
144.○D11
145.●B11
146.○H12
146.○K9
Could have make things worse for Black, but I had no reason to complicate things further.
147.●J11
148.○N15
149.●H11
150.○Q8
151.●P8
152.○R8
153.●Q11
154.○R9
155.●P9
156.○T11
157.●T12
158.○T10
159.●S12
160.○C9
I suddenly thought that it would be valuable to make the peep at F9 less valuable, while simumlatnelously making it harder for Black to get points around B9. Still, there were many move that were a point better or two.
161.●L2
162.○M2
163.●F9
164.○F10
165.●G10
166.○F11
167.●G11
168.○G2
168.○H18
Is bigger. I was choosing between the move in the game and this. And, once again, made the wrong decision. Grr..
169.●H2
170.○F1
171.●G18
172.○H18
173.●H19
174.○J19
175.●G19
176.○J18
177.●M13
178.○D1
179.●C1
180.○B8
181.●G14
182.○F15
183.●G13
184.○H15
185.●J13
186.○J14
187.●F8
188.○F7
189.●H6
190.○G6
191.●J6
192.○A7
193.●B5
194.○J7
195.●M1
196.○N1
197.●L1
198.○D13
199.●D14
200.○L4
201.●K4
202.○L3
203.●K2
204.○Q16
205.●E9
206.○D9
207.●A6
208.○R15
209.●Q14
210.○Q17
211.●S15
212.○A8
212.○A10
Is half a point better.
213.●A10
214.○H1
215.●J1
216.○G1
217.●D2
218.○E1
219.●L5
220.○G8
221.●G9
222.○M5
223.●F16
224.○G15
225.●K6
226.○H8
227.●B9
228.○A9
We forgot to set the komi correct, so the official result is that I won with 3.5 points, whereas with the correct komi I would have won with 9.5 points.
maxiGos 6.64
I celebrated the win with rather ungraceful bouncing around the room. We also won on board 3 and 4, and went on to win the match.